Note : Most of the chips featured in this article are discontinued - it may be possible to find them in some parts of the world or on the second hand market. The details here are however a useful primer for overclocking in general. The underlying principles are still the same, but you can't guarantee that the latest processors will overclock so well. Good Luck.
Before I begin, it’s important to stress that anything you attempt after reading this article is entirely at your own risk. These chips were not intended for this use and following these procedures will invalidate your warranty. Please do not try and hold me responsible for anything that goes wrong. Right, that’s my arse covered, if you’re still with me then read on – it could save you some serious cash. To give you an idea of what you could be missing, take a look at my benchmarks page and see what you can achieve.
Introduction
What Is A Celeron ?
What Is Overclocking ?
What Do You Need To Overclock?
MotherBoard
Memory
Case
CPU
Other Parts
Assembling The Components
Overclocking Your Chip
Tweaking Your System
Stress Testing
Utilities
Links
Tips & Tricks
Introduction
Since I started writing my PC benchmarks page I’ve been inundated with requests for more information. Well, I had to start somewhere too. Finding the information required can be a bit of a minefield. In the last six months I’ve hung about in several hardware Usenet newsgroups and message forums. I’ve gathered as much information as you will need to either upgrade your current PC, build something new from scratch, or create a complete hybrid. This item is aimed mainly at the upgrader. How annoying is it to have bought a machine 2 years ago, only to find it’s out of date?
Personally, I’m a gamer, a hobby which requires a real powerhouse to get the most out of it. I’ve built, or helped build several overclocked Celeron machines in the last few months just to increase my (and my friend’s) gaming pleasure.
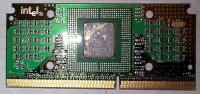
| In mid 1998, Intel released the Celeron 266 chip, shortly followed by the Celeron 300. Based around similar architecture to Pentium 2 technology but with a major ingredient missing – level 2 cache. Many saw this as a shortcoming (which Intel later rectified with the 300A), however a combination of this and the P2 0.25 micron die size meant that this chip runs cooler than any other out there, this being an essential asset in the overclocking world. |
|
What’s Overclocking and why do it?
Every CPU is designated a clock speed by the manufacturer. As clock speed (rated in Megahertz) increases so does the price. At the time of writing a, Intel’s range of processors varies from the £80 Celeron 266 to the Pentium II 450 at £520. Now what if you if you could get the performance of the latter chip for the price of the former? To do this you need to overclock – essentially run the cheaper, lower rated chip, at a clock speed far higher than Intel ever intended. After the Celeron and Pentium II line of processors, Intel intend to make overclocking impossible on their next line of chips - this could be your last chance to get some serious power for a cutdown price.
What do you need to Overclock?
There are two essential ingredients to successful overclocking – good quality components and a little luck. If you feel you’re an unlucky person then maybe you should stop reading this article and go buy a new machine from the high street. Stick with me and you might save some cash.
The Components
Intel Celeron chips will run on EX, LX and BX based boards. To overclock a Celeron you should purchase a motherboard based on Intel’s BX chipset. The BX design was the first to introduce the 100Mhz front side bus. This means that the memory and processor (CPU) can run at up to 100Mhz, whilst all other components run at the same speed as on older Intel chipsets. This ensures compatibility and makes it an excellent option for somebody wishing to upgrade his or her existing machine.
My personal preference (and of many other overclockers) are Abit’s boards. These come in 2 flavours – the BX6 and the BH6. The decision between which to buy depends on what you’ve got already in the way of ISA and PCI cards.
The BX6 has space for 3 ISA cards whereas the BH6 only allows for 2. The only other differences to note are that the BX6 comes with 4 memory (DIMM) slots, whilst the BH6 has 3. Also, the BX6 is a slightly larger board and can be a tight fit in some PC cases. I currently use a BX6 which is slightly too big for my Super Micro case. This means that the fourth memory slot is unusable – not a problem for me but may be to someone else.
So why choose an Abit board over other manufacturers? Well you can overclock with other makes of boards, but the Abit makes it easier with its use of Softmenu. I’ll explain it in more detail in the tweaking section later.
![]() Abit have just released a new motherboard - the BX6 2. It has the same card
slots configuration as a BH6 (5PCI / 2ISA / 1AGP) but it has 4 memory slots like a BX6.
This has to be the board of choice now.
Abit have just released a new motherboard - the BX6 2. It has the same card
slots configuration as a BH6 (5PCI / 2ISA / 1AGP) but it has 4 memory slots like a BX6.
This has to be the board of choice now.
To get the full benefit of the BX chipset you’re going to need some good RAM. Fortunately memory manufacturers have been making memory to a standard designed for BX motherboards known as PC100. Any memory labelled PC100 should be capable of running at 100Mhz bus speeds.
Most UK retailers will not specify who manufactures the RAM they are selling, you just have to wait and see what you get. It’s possible to buy very high quality ram that will run at higher speeds but comes at higher prices. This is only worthwhile if you believe the processor you’ve purchased will run higher than 100Mhz.
If you've previously bought EDO SIMMS you will have had to buy them in matched pairs. This is no longer necessary - PC100 DIMMS can be put in individually.
I personally own a single 128Mb of Micron Tech RAM. This is rated up to 125Mhz, however my current Celeron CPU refuses to run at anything over 100Mhz so I’m unable to reap the benefit of the faster memory.
The case is probably the item which people spend the least time in choosing. For me it was the hardest decision to make out of all the components I’ve bought. For a start this is the bit that sits on or under your desk, so it should be aesthetically pleasing. OK so that’s not the most important benefit to overclocking, but you’re the one that has to look at it.
The thing to look at when choosing a case for overclocking is airflow. An overclocked CPU will generate more heat than when it’s run at normal speeds, this can cause it to crash. It’s therefore a good idea to get this hot air expelled as quickly as possible. Ideally, a case should draw cool air in, via one or more fans, blow across the CPU (and any other cards that might get warm) then expel this warmer air out by means of another fan. You’ll read about people with 15 fans in their case. That’s all very well, but if they’re not arranged correctly then things will start to warm up.
I’m currently using a Super Micro SC501 ATX case, which keeps everything nice and cool. It has one large fan on the front sucking cool air in, another at the back drawing the warmer air out. Using my Abit motherboard (through the LM79 chip) I’m able to measure the temperature inside my case – it rarely goes above 80° F. This case is quite expensive at £100 but I’ve not regretted it.
If you’re upgrading an existing machine then it’s possible that the case you already own will be adequate. Just make sure it’s ATX form factor. The best way to confirm this is to see if the serial, parallel and keyboard ports are an integral part of your existing motherboard. If they are then it’s probably ATX. If the ports are connected via small ribbon cables to the motherboard, you are probably using an AT form factor case. It may be possible to get an AT sized BX board to fit in this case, however overclocking it will probably be more difficult. The Abit BX6 and BH6 are both ATX.
The brains behind it all, and the component that’s going to take the stress of overclocking. Before I go on to suggest what chips you should look at, it’s important to understand how multipliers and bus speeds combine to give the overall processor speed.
Celeron processors were designed to be used on motherboards with 66Mhz bus speeds (it’s actually 66.6). The multiplier is the factor that 66 should be multiplied by to achieve the speed that Intel designates the chip. For example a 266 chip has a multiplier of 4 (66.6 x 4 = 266), while a 300 chip has a multiplier of 4.5 (66.6 x 4.5 = 300). On all new Intel chips this multiplier is locked and cannot be changed. Therefore to overclock we need to change the bus speed.
As these Celeron chips are fabricated to the same standard as modern 100Mhz Pentium II, most of them also run at 100Mhz as well as 66. Therefore what was a 266 with a multiplier of 4 can run at 400. A 300 with a multiplier of 4.5 can run at 450.
There are 3 chips which are I’d recommend trying. I’ve had success with the first two, but not yet had a chance to try the SL2W8 option.
Any other components are not critical to overclocking a system. Providing you stick with the 100Mhz-bus speed only the CPU is overclocked. I mentioned earlier that I had the bus speed set to 112Mhz for the Celeron 266. This does put extra strain on hard drives and PCI cards so I’m not going to recommend it in this guide. It’s only worth experimenting with this once you’ve convinced yourself you have a stable system running at 100Mhz.
Ok so now you know what parts you need. Now it’s just a matter of putting them together. I’ve done this many times before and find it second nature now. If it’s the first time you’ve looked at PC components it can be quite daunting. Don’t worry it’s very hard to do any damage. Take notice of all anti-static warnings and purchase a wrist strap if you are really paranoid.
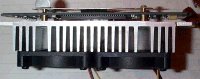
| First of all attach the heatsink and fan to the CPU. If you’ve bought a retail version of the CPU then it will probably be attached already and you can skip the rest of this paragraph. If you bought a heatsink/fan combo from a third party then it may also have come with some thermal grease. A small amount of this should be applied to the surface of the CPU that the heatsink attaches to. It’s designed to seal the void between chip and heatsink to help dissipate the heat. Use of thermal grease can reduce CPU temperature by a couple of degrees. |
|
Next is to get the motherboard ready for the CPU. Abit motherboards come with a retention bracket that is designed for a Pentium II chip. It’s not ideal for use with a Celeron but it’s good enough. If you’ve bought a different brand of BX board then refer to the instructions supplied. I’ll go on to describe how the Abit stuff fits together.
There are two small semicircular brackets that fit under the motherboard and poke through to the top either side of the CPU slot. The retention bracket sits on top of these, once on they can be tightened with a screwdriver. If you want to check that the CPU fits in OK then try it out now. Don’t push it in all the way, just make sure you’ve got everything around the right way.
Now screw the motherboard into the case. It should be fairly self-explanatory which way around it fits in. Make sure the slots on the motherboard line up correctly with the slots at the rear of the case. The screw holes in the motherboard will line up with those on the case. Put each screw in and tighten lightly. Once they are all in tighten them up. There are several connections that need to be made between the case and the board. Primarily there is a large rectangular connector, which is for power. This only fits around one way, make sure it’s in firmly. Then there’s a whole tangle of cables leading from the front of the case, these control things like the power switch and hard drive lights. Check in the motherboard manual for exactly where they go.
Now the motherboard is in, you can start adding the rest of the components. There’s no definitive order on doing this but try and work out where everything is going to fit beforehand. This way you can avoid taking items in and out which get in the way of each other.
It’s probably a good idea to get the CPU in first. The heatsink’s fan gets its power from a small 3-pin connector on the motherboard – these can be hard to get to when your other peripherals get in the way. Push the CPU into the slot – make sure it goes all the way in, it’s quite easy to leave it half way out. If you do this, the machine won’t even power up (but you probably won’t do any harm). Once in, connect the small lead from the heatsink onto the 3 pin connector I mentioned before.
Next put in the memory. Check the motherboard manual for RAM slot 1. Then look at the raised lips along the slot. Compare this to the DIMM chip and you’ll realise it can only fit in one way. Push it in. As you do the two retention clips will close around the chip. Job done.
These are all the new components together. Now it should be just a case of moving the remainder of the parts from your old machine into the new. Most of it should go in similar locations to where it was before. Refer to the motherboard manual for the correct orientation on connectors – remember that the red stripe on ribbon cables goes into pin position one.
If you’ve upgraded from an AT case and motherboard you should be impressed with how tidy everything now looks.
It is a good idea at this point to get your system up and running before proceeding to the overclocking step. Test out your applications to be sure everything is working correctly and that you can access all your drives. If you attempt to overclock straight away and encounter a problem, you won't be sure if it's the overclocking that's caused it, or it was a problem before.
Now for the serious part. This is where we can get the big performance boost, just with the press of a few buttons. Everything that follows is particular to Abit motherboards. On other boards you will have to tape over pins on the CPU and set jumpers to get the same results with Abit you can do it all in a menu.
It’s time to get familiar with the Abit Softmenu. Power on and you should see the initial BIOS (Basic Input Output System) start up screen. Hit the <Delete> key during or shortly after the memory test and you should be presented with the following CMOS setup: (you've probably already been here to detect your hard drive)
ROM PCI/ISA BIOS (2A69KA1A) |
| !! CPU SOFT MENU II !! | LOAD SETUP DEFAULTS |
| STANDARD CMOS SETUP | LOAD BIOS DEFAULTS |
| BIOS FEATURES SETUP | PASSWORD SETTING |
| CHIPSET FEATURES SETUP | IDE HARD DISK DETECTION |
| POWER MANAGEMENT SETUP | SAVE & EXIT SETUP |
| PNP, PCI & ONBOARD I/O | EXIT WITHOUT SAVING |
Select the CPU soft menu option and you should end up here:
ROM
PCI/ISA BIOS (2A69KA1A) |
| CPU Name is | Intel Celeron MMX | .. |
| . | . | .. |
| CPU Operating Speed | User Define | . |
| - Turbo Frequency | Enabled | . |
| - External Clock | 66Mhz | . |
| - Multiplier Factor | x4.5 | . |
| - AGPCLK/CPUCLK | 2/3 | . |
| - Speed Error Hold | Enabled | . |
| . | . | . |
| CPU Power Supply - Core Voltage |
CPU Default 2.00v |
. |
If this is the first time you've been into this screen then it will look a little different. The CPU Operating Speed will report what it thinks the chip should be running at. A Celeron 266 will show 266(66) while a 300 will show 300(66). Select this option and use the <Page Up> and <Page Down> keys until User Define is highlighted. Once this is selected then all the above options will become available.
Move the cursor down to the External Clock option and change it until it reads 100Mhz. Now change the Multiplier Factor until it is the same as your chip - a 266 should be set to 4.0 while a 300 should be set at 4.5. As this is the first time you've attempted to overclock, don't change anything else now. Escape out to the main CMOS menu and select Save & Exit Setup. Reply (y)es and your system will reboot. All being well the intial boot screen will appear and report you now have a Celeron MMX at 450Mhz. If you've got a really good chip then it will boot all the way into your Operating System (OS) with the default settings. This doesn't necessarily mean the system will be stable - you will have to stress test it to make sure. If you booted but got a message saying that the 'CPU is Unusable or Has Changed' then re-enter CMOS and change Speed Error Hold to Disabled. If you didn't get as far as the Operating System or you were left with just a blank screen then there's more tweaking required. Reboot.Get yourself back into CMOS setup by holding down <Delete>. If you were left with a blank screen then you will probably have to power down and reset the CMOS to defaults. To do this, power up whilst holding down the <Insert> key. You should be back in the CMOS setup screen again. Time to do some more tweaks.Tweaking to get a more stable system If you found that you couldn't boot, or you were having errors in your OS then there's some more playing that we can do to get it to work. Warning! What follows could fry your CPU. I've had to follow this procedure several times before and not had a problem - remember this is at your own risk. To get the CPU stable we need to give it some more power. You should be back in the CMOS Soft menu:
ROM
PCI/ISA BIOS (2A69KA1A) |
| CPU Name is | Intel Celeron MMX | . |
| . | . | . |
| CPU Operating Speed | User Define | . |
| - Turbo Frequency | Enabled | . |
| - External Clock | 100Mhz | . |
| - Multiplier Factor | x4.5 | . |
| - AGPCLK/CPUCLK | 2/3 | . |
| - Speed Error Hold | Enabled | . |
| . | . | . |
| CPU Power Supply - Core Voltage |
User Define 2.10v |
. |
Move down to CPU Power Supply and change it to User Define. You will now be able to change the Core voltage from its default setting. With Celerons you should increase the voltage by 0.1v at a time, save and exit then reboot. If your machine still won't boot all the way into the Operating system then you should keep increasing the voltage. The highest that can be accepted by default is 2.3v. If your CPU still won't boot at this voltage then it's unlikely it never will - unfortunately not all chips will overclock. It's possible to get higher than the default 2.3v with some playing - I'll cover that later.
My Celeron 266 ran perfectly stable at 448Mhz with the default Core Voltage of 2.0v. However my 300A required 2.4v to run stable at 450Mhz. It just depends on the chip you have. If you're still not having any luck then maybe it was never meant to be. You can either live with the chip running at its default speed or try and return it for another. There is the option to try other bus speeds such as 75 and 83Mhz, however this puts extra stress on hard drives and PCI cards - it may cause you more problems. Many people have reported that Celeron chips refuse to overclock immediately and they have to 'burn them in' for a few days at the default settings. After this period the chip will overclock successfully so it may be worth trying.Stress Testing Hopefully by now you have got your system up and running with an overclocked CPU. Congratulations. However, it's unlikely that you can be sure it is stable until it's been run that way for a while. By far the best application I've found to stress test a system is Unreal by Epic Megagames. My 300A running at 450 ran everything perfectly at 2.3v until I loaded this one up. It will generally run the boot-up flyby demo OK for hours but the real test is to play the game - it puts more stress on the CPU. It will exhibit crashes out to Windows and full system lock-ups on occasion if the system isn't stable. It's also an extremely good game, so go get hold of it - hopefully a shareware demo will appear some time soon.
Another utility you may wish to try out is Prime 95. See the utilities section for a download location.
If you know of any other good 'stress testers' please email me.
Here I will provide some links to useful tools that you can use in your quest to Overclock. I haven't tried most of them out so make sure you browse any readme files before you use.
Hmonitor
Homepage - Program to monitor motherboard temperature and fan speed within Windows. Is
apparently compatible with more motherboard makes than any other similar utility.
Motherboard Monitor Homepage
- Another popular motherboard / fan monitor..
CPU Mon Homepage - Another temperature
monitor.
Rain (120Kb) - This
zip file contains both Rain and Waterfall - both of which can be used to decrease your CPU
temperature. Link submitted by Matthew Barnes.
CPU Idle Homepage - Another cooling
utility.
Prime95 - Download from the files section of AlienPC.
This is an excellent CPU stress tester - run the torture test and see if your machine can
handle it
![]() There's some utilities knocking about at the moment that allow you
to overclock your Front Side Bus while Windows is running. I'm trying these out right now.
Stand by for an update.
There's some utilities knocking about at the moment that allow you
to overclock your Front Side Bus while Windows is running. I'm trying these out right now.
Stand by for an update.
Overclocking Pages
Sharky's Extreme Celeron
Overclocking Guide - Worth taking a look at the rest of this site too.
CPU Central - Some good hardware info.
BXBoards - Excellent guide to current hardware and some
good info on how well certain chips will overclock.
Sysopt.com - Another basic overclocking
guide.
General Hardware Pages
Tom's Hardware Guide
Anandtech
Usenet groups
comp.sys.ibm.pc.hardware.chips
alt.comp.hardware.overclocking
Overvolting an Abit board, taking voltage tweaking to the extreme. The standard Abit BIOS will only alow the voltage to be set up to 2.3 volts which sometimes isn't enough. I have to do this to get my 300A stable at 2.4v but it's not recommended if you are worried about burning out your CPU.
Core Voltage has to be set to User Define 2.30v. Then put the bus speed up high enough that the machine will not post. 112 x 4.5 works for me. Then power off - I have to remove the power cord to do this. Hold Insert and plug it back in. CPU defaults back to 233(66) but the default for Core Voltage is now 2.30v. Now the selectable range is 1.30v to 2.70v.
If you've got some overclocking tips or you've produced an overclocking site then please let me know. I will give you a link and/or give you credit where it's due. Contact me here.
| All above is copyright 1998/1999 Steve Griggs. If you really want to steal it (and you must be really desperate) then please ask and ye shall more than likely get |
|